Welcome!
Thinking of How to Start A Blog?
You are at the right place. Here you will find
7 Comprehensive Easy and Simple Steps on How to Start Your Blog in Just About 15 Minutes.
Today, more businesses and
individuals have online presence than ever. Starting your own blog is not a
skyrocket course and it is also inexpensive as most people think. We’re living in the
21st Century and the world has become a global village where every Joe and Julie
have blogs, why won’t you create an online presence for yourself?

Most people who want to start a blog are wondering where to begin, especially those who do not have the necessary skills. Secondly, there are too many options out there on how to start a blog which confuses and discourages a lot of people.

1. Start Your Blog
the Right Way
2. Are You Passionate
About The Topic?
Do not be ashamed
to learn from other experienced and professional bloggers who have been
blogging for years. Their experience will help you not to repeat the mistakes
they made and save you a lot of headaches.


Most people who want to start a blog are wondering where to begin, especially those who do not have the necessary skills. Secondly, there are too many options out there on how to start a blog which confuses and discourages a lot of people.
You may skip this
introduction and go straight to step one here.
Some Reasons Why You Should Use This Guide:

Hey! I'm Andrew, and I'm here to walk you through the 7 comprehensive and easy steps on how to start your blog and ensure you build a successful and profitable blog.
Over the years, I have built blogs and sites for myself and
others and want to tell you that experience has shown that to be successful in
blogging, you must consider these very important points:
As your companion,
I will hold you by the hand and walk you through the 7 steps on how to start a
blog whether you choose to use a free blogging platform like blogger, wordpress
or paid hosting service I am always available to help. All these blogging platforms
can be accessed from any computer (Mac or PC), and most mobile devices.
Sharing the
information you have with other people is why blogs exist. In order to start
and sustain a blog you must be passionate about the topics you’re blogging
about. This is one important point that will make you rich and successful as a
blogger.
3. Learn from Others
You may skip this introduction and go to step one here.

Why You Should Start Your Blog Today and Now?
Around 40% of the world's population have internet access
today. In 1995, it was less than 1%. The number of internet users has increased
tenfold from 1999 to 2013. The first billion was reached in 2005. The second
billion in 2010. The third billion in 2014. The internet is growing at an exponential
rate. This means more people are going online every day and your blog could be
one of the sites they want to visit just the way you are reading this blog now.
So, the best time to start your blog is now!
Things you stand to benefit from your blog:
#1. Make Money
Sincerely speaking, when you set up your blog correctly it
can fetch you good money for many years. All you need to do is write quality
content once, and it will keep paying you from a few hundred to thousands of
dollars continually every month for years.
#2. You Get Respect and Recognition
You may not become a super star. Depending on the topic or
field you choose to blog or write about, if you give people quality
information, over the years you will gain respect and recognition from folks
around the world.
#3. Fun and Enjoyable!
Apart from recognition and the money you make, when you blog
on whatever topic you choose to, you will eventually attract like-minded people
who may in turn share life changing ideas and information with you. And you’ll
enjoy what you do because you are passionate about it.
If you encounter any issues, feel free to contact me and I
will personally respond.
Everything you need to Start your blog, build and lunch it
live to the world is covered in this 7 - Steps Guide but if you run into any
issues, or want advice, please do not hesitate to contact me at any time. I am
passionate about blogging and would love to talk with you!
Step #1: CHOOSING A DOMAIN NAME AND HOSTING COMPANY
Why I recommend blue host?
1. Over 2 Million websites are hosted worldwide and no bad review as far as I know.
6. They offer a free, simple installation of all the popular blogging tools.


Select your domain name and click the “Check Domain” button.


In case you have any trouble installing your
blog. I'm by you, contact me with a click.

How to Change Your Blog Title

Once on this screen you may change the “Site Title” and subtitle, also known as “Tagline”. Input Title and subtitles of your choice in the two boxes provided. You also have the options to change your Time-zone and Date Format. When you are done click the “Save Changes” button below and the changes will appear live on your blog. You can see the appearance of your site at any time. To do this without interrupting your current work, open a new browser tab and type your domain name and hit the enter or go button.


Every WordPress blog usually contains a default post titled “Hello World!” You don’t need it. To delete it simply click the red colored “TRASH” button below it. See the image below for a better understanding.

Click “Add New” to begin writing a new post. It is found in the left menu or next to the word “Posts”. See the image below:


To add a picture or video to your post, click “Add Media” button, (just below the post title) and click “Select Files” to upload a picture from your pc. Adjustments to the picture size and alignment can be done on the next screen. When you’re satisfied click “Insert into post” to add the picture.

When you’re done making necessary adjustments and proof read your post, click the “Publish” button on the right side of the screen to publish your post.


To remove the “Website Coming Soon” page, you can do so by login to your account then click on dashboard and click the link as shown in the image below:

At this stage you should have installed WordPress. If not,
go to Step #2 here and install it.

WordPress blogs come with pre-installed themes. Some of the popular themes are Twenty Twelve, Twenty Fourteen, Twenty Fifteen etc. all these themes can be used for almost any type of blog. Most professional bloggers around the world use these free themes.

You don’t like any of the pre-installed themes? Don’t bother yourself because there are uncountable themes that are available for free installation. To install a new layout or theme, click on the “Appearance” tab again then click on the “Add New” button as shown on the image below.

Step #1: CHOOSING A DOMAIN NAME AND HOSTING COMPANY
Before you get started fully, you need to get the following
things done:
1. Choose a suitable domain name.
Do you have a registered domain already? Then go straight to
Step #2 here.
When choosing a domain name, let it be unique and
descriptive. This will enable your audience to instantly know what your blog is
all about.
After choosing a unique and descriptive name, the next thing
is to choose a domain extension: .com is the most popular; .net and .org are
also good. Extensions such as .me, .co, .us or .biz, are not familiar to most
people, I advise you don’t use them.
If the domain name you want is already taken, don’t worry
this happens most of the time. The solution to this is to add words like “the”,
“a”, or “my” to your domain name, or insert dashes in between words like;
your-site-name.com or choose another unique name.
Important Note: You are not allowed to use special
characters in a domain name such as: ?, #, @, $ etc.
There are online tools that could help you generate
different domain name suggestions if the name you have is already taken or you
are confused of which name to use. All you need to do is enter the word (s) or
name you want to use then it generates a whole list of available names to
register. Some of the tools are:
www.namestation.com, www.bustaname.com, www.impossibility.org, www.namemesh.com.
2. Choose a hosting company.
Web hosting companies are companies that provide space on a
server owned or leased for use by clients, as well as providing Internet
connectivity, typically in a data center. They store all of the files for your
website or blog and also ensure they are safe and deliver them to visitors who
visit your website or blog. You need a web hosting company to host and run your
blog.
The type of hosting company you choose will determine the
success or failure of your blog. If you
choose a bad hosting company you may end up having a blog that takes longer time to load
pages and this will frustrate visitors who come to your blog.
There are innumerable web hosting companies out there, but
from my experience, I strongly recommend you start your blog with
BlueHost. Watch an unbiased review of Bluehost in the video below.
Why I recommend blue host?
1. Over 2 Million websites are hosted worldwide and no bad review as far as I know.
2. They offer a money-back guarantee if you are unsatisfied
for any reason after 30 days.
3. I've hosted more than 20 websites and blogs for myself
and others and never experienced any serious issues.
4. They have been recommended by WordPress, Joomla and
Magento since 2005.
5. They offer industry leading and very fast and reliable
customer service support 24/7 by phone, mail and web chat.
6. They offer a free, simple installation of all the popular blogging tools.
7. They offer ‘.com’
domain registration free and 99.9% uptime of your blog or site is guaranteed.
BlueHost is a credible company with quality services though
it cost a bit more ($5.99 per month) than other web hosting companies who may
not offer you quality service. If you click this link or one of BlueHost’s links on this
blog before 30th of this month you get Bluehost's Promo Code 2015 and pay only
$3.49 per month this include a free (dot com) domain name for your blog.
If you have trouble setting-up your blog with this Guide,
contact me and I will set it up for you. BlueHost Company compensates me at no
additional cost to you when you sign up through one of the links on this blog, that's why my services are free of charge to you! So we've got a win win situation.
Step #2: HOW TO SET UP YOUR BLOG
We're going to set up a blog using BlueHost service. To to this click here you will be taken to the home page, then click on the 'get started now' button if you want to signup right away.
1. Click here to get the Promo Sale price of 3.49/mo onBlueHost before 30th of the month and then click ‘get started now’ button.

2. Select a plan. I recommend the “starter” plan for new
bloggers. Click “Select” to choose your plan.

3. Enter the domain name you wish to use into the box on
your left and click “next” to see if it is available or not.

If you already own
a domain name and wish to use it for your blog, then type it into the box in
the right and click “next”. Note that the box is only for those with registered
domain names.
4. In case the domain name is not available, BlueHost will
generate similar names that are available for you to choose from. You may
choose one of the suggested names or keep trying until you get your
choice. These free tools mentioned earlier will help you in choosing a domain name for your blog.
(www.namestation.com, www.bustaname.com, www.impossibility.org, www.namemesh.com).

5. After you have successfully chosen a domain name for your
blog, you will be taken to the registration page where you will supply your billing
details.

6. The next step is where to choose your hosting package and
other options.
You may choose 36,
24 or 12 months package. The choice is yours to make. If you are thinking of long term blogging I advice you go for 36
months package. You may uncheck the
boxes next to the other products when signing-up. You can sign up for this
options later if you wish.

7. After completing these steps which should take you just a
few minutes, go to the BlueHost homepage and login by clicking the log in tab
at the top. Supply the login details (domain name or username and password) you
chose when registering.

8. Have you successfully logged in? Let’s install WordPress,
the software you will use for your blog. Please, close any pop-up windows, then
look under the “Website” heading and click the “Install WordPress” button.
If this is getting too complicated, contact me here and I will be glad to help you install your blog for free.

Once you click on the WordPress link it will take you to
Mojo Marketplace which is where you install WordPress. To stall it, click on
the “Install” button.


Check the “Show advanced options” box. Then enter your site
title, username, and password. All of these can be changed later except the username.
Write down your username and password and keep them in a safe place so you
don’t forget it! You must agree to the terms and then click “Install Now”.

WordPress is now installing! This should take just few
minutes.

9. Click “View Credentials” at the top of the page to see
your login details when the installation is completed. This detail is only
available for 12 hours as indicated, so ensure that you write it down and keep it in a safe
and secure place!

When the installation finishes you will be sent an email
containing your login details.
STEP #3: HOW TO USE YOUR NEW BLOG
Have you installed WordPress yet? If not, go to Step #2 here
and do so.
After WordPress is successfully installed, you are ready to
start blogging. This step will familiarize you with the basics on how to use
WordPress blog. You will also learn how to change the design, theme and other
advanced settings of your blog.
How to Login to Your Account
You need the log in details (user name and password) that
was sent to you from BlueHost to access your account. Open a browser and
type: www.sitename.com/wp-admin this
will bring up a screen as shown in the image below. Now type in your user name
and password. Remember to substitute sitename with your domain name, like
www.yourblogname.com/wp-admin .

How to Change Your Blog Title
This is where you change the title of your
blog. Once you have logged into your account administrator area as shown in the
preceding step above. Click on “Settings” in the bottom of the left menu as
shown in the screen below:

Once on this screen you may change the “Site Title” and subtitle, also known as “Tagline”. Input Title and subtitles of your choice in the two boxes provided. You also have the options to change your Time-zone and Date Format. When you are done click the “Save Changes” button below and the changes will appear live on your blog. You can see the appearance of your site at any time. To do this without interrupting your current work, open a new browser tab and type your domain name and hit the enter or go button.

Writing a Post on Your Blog
Blogging is all about writing and posting. This step will show
you how to write your first blog post.
Click on “Posts” on the left menu. (It’s the third option
from the top)

Every WordPress blog usually contains a default post titled “Hello World!” You don’t need it. To delete it simply click the red colored “TRASH” button below it. See the image below for a better understanding.

Click “Add New” to begin writing a new post. It is found in the left menu or next to the word “Posts”. See the image below:

Now you should be on the ‘Add New Post’ screen. Enter the
title of your post in the upper box and the body or content of your post in the
lager space or box below. See the image below.

To add a picture or video to your post, click “Add Media” button, (just below the post title) and click “Select Files” to upload a picture from your pc. Adjustments to the picture size and alignment can be done on the next screen. When you’re satisfied click “Insert into post” to add the picture.

When you’re done making necessary adjustments and proof read your post, click the “Publish” button on the right side of the screen to publish your post.

Publishing Your Blog
“Website Coming Soon” may still be showing on your blog even
after you have written a post. See the image below:

To remove the “Website Coming Soon” page, you can do so by login to your account then click on dashboard and click the link as shown in the image below:

Congratulations! You have successfully published content on
your blog!
The next step will describe how to make further changes to
your blog but they are optional and not really necessary since your blog is
live for the world to see.
Step #4: CONFIGURING YOUR BLOG
I believe you should have familiarized yourself with the basics on
how to use your blog by now. WordPress is a flexible and easy to use tool that
allows you to build your blog to any layout, shape or design of your choice. In
this section we will get into more details such as how to personalize, change
layout and design of your blog.
How to change your ‘Basic Blog Design’
WordPress has a whole lot of free layouts that you can use
to change the appearance of your blog within minutes.
You change the layout of your blog by using “Themes” in
WordPress. To carry out this change, click on the “Appearance” tab on the left
menu, it is under “Marketplace”.

WordPress blogs come with pre-installed themes. Some of the popular themes are Twenty Twelve, Twenty Fourteen, Twenty Fifteen etc. all these themes can be used for almost any type of blog. Most professional bloggers around the world use these free themes.
Except you are building a special blog otherwise any of the
pre-installed themes should work for you. Let’s use the “Twenty Twelve” theme
as an example. To choose this theme for your blog, just move your mouse pointer
over it and click the “Activate” button. Voila! You have a new theme for your
blog. See image below:

You don’t like any of the pre-installed themes? Don’t bother yourself because there are uncountable themes that are available for free installation. To install a new layout or theme, click on the “Appearance” tab again then click on the “Add New” button as shown on the image below.

You will find a search box on the next screen. On this
screen you have many options on how to find a theme for your blog. You have the
choices of searching by color, layout and by using the “Feature Filter” button.
Click on Feature Filter, check the boxes you want and click “Apply Filters”
button. See the image below for more details.


When the theme is installed click “Activate” button to
activate the theme on your blog. To view the new layout of your blog, open
internet browser and type your sitename.com, press the ‘ENTER’ button and view
your blog’s new look!
The administration area is where you create menus. Click on
“Appearance” tab then click on “Menus”. See the image below:

Let’s create a new menu called “Main Menu”. Enter the name in the “Menu Name” box and click “Create Menu” button.


Let’s add another item to the navigation menu. To add a link to a page that was created earlier, click on “Pages” section of the menu editor. See the image below:


Here you can browse through the available themes, when you
find the one of your choice, move your mouse pointer over it and click the blue
“Install” button.

How to Create Menus
Now, let’s walk through the process of creating a basic
navigation menu so that visitors to your blog can easily navigate through
sections on your site.

Let’s create a new menu called “Main Menu”. Enter the name in the “Menu Name” box and click “Create Menu” button.

You can start adding items to the menu. For instance, to add
a link to the homepage of a blog.
Click on “Custom Links”. Then enter the URL of the blog’s
homepage. The home page is your domain name with “http://” in front of it (without quotes “”). i.e, http://yoursitename.com
Now enter the “Link Text” this is the text that will appear
in the menu in the link to your homepage. Call the link “Home”.
Once you finish entering the URL and link text, click “Add
to Menu”. See the image below:

Let’s add another item to the navigation menu. To add a link to a page that was created earlier, click on “Pages” section of the menu editor. See the image below:

Once you click on pages, it will bring up all the pages that
have been created so far. If no pages are created, then this area may show a
“Sample Page” or appear blank. To create a new page, click “Pages” on the
left-menu of your blog's administrator area and click “Add New”.
Let's add a page to the menu called “Contact Me”. To do this
click the check box next to the page and then click “Add to Menu”. Then click
“Save Menu” button to save the changes made. See the image below:

You have successfully created your menu; now add the menu to
your blog. In order to do this, click on the “Manage Locations” tab. In this
example, let's add the menu we created earlier called (“Main Menu”) to the
“Primary Menu” area. Use the drop-down box to do this and click the “Save
Changes” button.

How to Customize Your Blog's Design
Now you have your basic blog design and navigation completed. To
further customize your blog, go to the “Appearance” tab on the left-menu of
your blog administrator area and click on the “Customize” button.
Clicking the ‘customize button’ will take you to a screen
that displays your blog homepage on the right and the customization menu on the
left.
NOTE: If your theme is different from the one used in this
guide, then you may have slight difference in your customization.

On this screen you have different customizations. Let’s walk
through them one after another.
Site Title & Tagline
This is where you change the title and sub-title of your
blog. If you choose to totally remove them, simply uncheck the “Display Header
Text” box and it will not display anymore.
Colors
This is where you change the background and text colors of
your header.
Header Image
This option allows you to add an image to your header. Note
that each theme has a different recommended image size for headers.
Background Image
This is where you change the background of your blog to an
image instead of a solid color. You also upload images in this section.
Navigation
The navigation menus
you want to use can be chosen from here. Note that the menus you want to choose
must have been created already, as shown in an earlier step on this page.
Widgets
The various items that are added to your blog sidebar menus
are called Widgets. This section is where you add or remove widgets from your
sidebar menu(s). This is a little more difficult than the previous options, so
let’s see an example.
To do this, click on “Widgets” and then click “Main
Sidebar”. This will display a list of the widgets that are currently in use on
the “Main Sidebar”.

There are 3 widgets: Search, Archives, and Meta.


You have a whole lots of widgets to add just as you wish, you may explore them.
Adding Plugins
Third party developers have created additional tools that you can freely add to your blogs which are called “Plugins”. A lot of free plugins are available out there that can help you carry out different things on your blog.
How to Change Your User Details
You can see those 3 widgets in the right sidebar area on
your blog. The Search widget creates a search box, the Archives widget displays
a monthly archive of your posts, and the Meta widget shows different links
related to your blog.
I prefer to delete all these widgets. To do this, click the
arrow next to the widget name and then click “Remove” button to delete it.

After removing the widgets I will add new one of my choice.
To do this click the “Add a Widget” button and select the widget you want.
Let's add the “Recent Posts” widget which will create
links to the most recent blog posts in the sidebar area.

Let's also add “Calendar” widget which will display the
current month’s calendar with dates. Once it is added, click the “Save &
Publish” button.

You have a whole lots of widgets to add just as you wish, you may explore them.
Adding Plugins
Third party developers have created additional tools that you can freely add to your blogs which are called “Plugins”. A lot of free plugins are available out there that can help you carry out different things on your blog.
Plugins such as the ones for adding social media buttons,
creating contact forms or enhancing your site’s visibility to search engines etc.
One of such plugin I recommend for new bloggers is called
“JetPack”.
This plugin has a lot of easy to use features. You can use
it to add images to your sidebar menus, publish your posts on facebook, see how
many visitors your page receives daily and many other features.
Plugins are optional and Jetpack is not an exception. You
can start blogging smoothly without JetPack or other plugins. Nevertheless, you
will benefit from the additional features that come with it. If you want to
learn how to install it, I will add a link here soon on How to Install Jetpack.
When you start a new blog it is important to change your
user details so that people know who you’re.
On this details page you may want to change your Nickname and E-mail. Your nickname is the public name that appears on all the posts you make, this should be on your mind when selecting it.
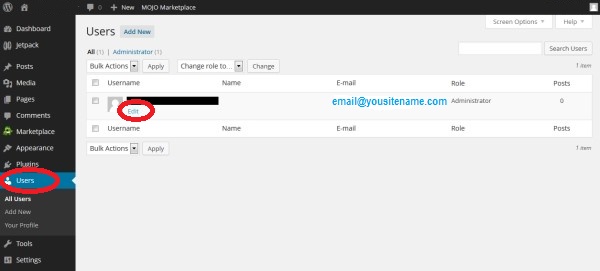
In order to do this, click on “Users” tab on the left menu.
Then click “Edit” under your username.

On this details page you may want to change your Nickname and E-mail. Your nickname is the public name that appears on all the posts you make, this should be on your mind when selecting it.
Now type the name you want into the “Nickname” box and then
choose that same name in the drop-down box next to “Display name publicly as”.
You can also change your email address if you want.

When you are done making all the necessary changes ensure you click the “Update Profile” button at the bottom of the screen in order to save the changes.

When you are done making all the necessary changes ensure you click the “Update Profile” button at the bottom of the screen in order to save the changes.
More Helpful Tips will be added here soon.
Now that you have completed this long step, you should have
an attractive and functioning blog. You are always free to make additional
changes to your blog at any time. You may not have a perfect blog from the
beginning but keep making corrections and changes where needed until your blog
becomes perfect.
Now let’s get to the most exciting part – writing posts on
your blog!
A small amount of highly targeted customers can lead to a six figure or more income. While it’s great to have 10,000 blog visits a day it doesn’t necessary mean you will make money from a higher percentage of these visitors, moreover, these are difficult numbers to reach and most people never do.
The blog you are on now only talks about how to start your own blogs, which means I target only those who are thinking on how to start their own blog like you reading this now (lol) and my major means of income. So target customers who are interested in your niche.
Step 5: How to Start Blogging!
The following principles if properly utilized, will make your blog a successful and profitable one:
- · Proper Blog Setup.
- · Quality Content.
- · Blog Promotion.
Proper Blog Setup
Steps #1, #2, #3 & #4 properly described how to set up
a new blog correctly. If you haven’t done so yet, please go to back to step one here to set
up your blog.
To be successful in blogging you
need to be well informed with the latest ideas and trends. One way of doing
this is by visiting other popular blogs regularly to ensure your own blog is up to date. If you find any tool that interests you on other people’s
blogs such as plugins or widgets, you may ask the blogger about it and in most cases
they always give you free information about it. This will also help set up your
blog correctly and at the same time establish friendship with other bloggers
around the globe.
The steps you have seen so far
should be enough to help you set up your blog properly, choosing to make
further changes in order to build a perfect blog may not be necessary at this
time, especially if you have limited skills in building blogs so you don’t get
yourself into technical issues that you cannot resolve easily. As you keep
blogging you will come to learn new ways of perfecting your blog. Don’t wait
until you have a perfect blog before you start writing and posting contents.
Quality
Content
The only way to succeed as a blogger
is by writing quality content. The easiest way of writing quality content that attracts
peoples’ attention is to answer questions that other people are asking about a particular topic. Just
like you, many people out there have questions yet to be answered. All you need to do is make a research on this
question and share the valuable answer with others who would read and share
with their friends. To summarize this point, I want you to know that your success
or failure is dependent on the quality of your blog’s content.
Visit this link to read how to write great blog content: http://www.problogger.net/how-to-write-great-blog-content/
Other than writing quality contents,
you also need to include images, videos, font styles and colors which will make
your blog very attractive and interesting to your visitors.
Blog Promotion
Marketing which is the process of
promoting, selling and distribution of products or services is very important
for a successful blog. If you correctly setup your blog and write quality
content, there is no guarantee that anyone will visit your blog. Therefore
there’s need to market your blog to the public.
The next step will show you
different ways of marketing or promoting your blog free of charge.
Step #6: HOW TO PROMOTE YOUR BLOG
As a blogger, one of the most
important things to do is to promote your blog. Not promoting your blog is like
someone with a wonderful product for sale but doesn’t want to tell others about
it. If you don’t tell others there is no chance of you ever selling your
product and in this case the product is your blog. Secondly, some people don’t
know how to promote or market their blogs or they simply don’t want to do it.
Thirdly, some give excuses such as they don’t have many posts or the design of
their blog is not perfect yet. Do not wait until you have a thousand posts or perfect design for your blog, after your hard work and plenty of time building your blog, do not be shy to tell others about it. The number of people who know and visit your blog will determine the
amount of money you stand to make.
How do you promote your blog? The
most effective methods of blog promotion out there are free of charge! Let’s
look at some of them:
1.
Use of Free Online forums
Join online forums where topics related
to your blog are regularly discussed. Most of these forums are free to join and
allow users to include links to their blogs or site while writing posts. Please
be sure to read the terms and conditions guiding each forum you join and abide
by them.
In order to attract people to your
blog through forum posts, it is advised you write quality, helpful and
interesting posts. If your forum posts are not interesting and helpful people
won’t visit your blog through the links you placed in those forums.
2.
Frequent Posting or Not?
I have heard bloggers talk about how often they write
posts, what matters most is not how often you post but the quality of the
contents and the value you give to your readers and how you share those contents with others. So if your goal is to post
more frequently, ask yourself how you’re going to come up with so much content
and how to always balance between high quality content and frequency. That’s my candid advice for you.
3.
Use of Social networks
Do you know
that Facebook and YouTube alone have more than 1 billion users each and twitter 230 million
users? Not to mention other social networks such as LinkedIn, Tumblr, GooglePlus, Instagram, Pinterest etc. There is a great possibility that you already have
account with one or more of these social networks, if not, why not set up
accounts with them it is absolutely free. These social networks are powerful
tools to promote your blogs and connect with other experienced bloggers and people
who are interested in the topics your blog about. Do not underestimate the
amount of exposure your blog will get when you share your blog’s quality
content using these networks.
4.
Linking other blogs
Linking to other blogs is another
way of promoting your blog. This is known as trackback. Trackback is an automatic notification sent when
a link has been created to a person's blog post from an external website,
allowing a reciprocal link to that website to be created. One way of doing
this is to write a blog post as a response to a post from another blog or
website expressing your agreement or disagreement to a particular topic then
adding a link from that blog. You promote your blog through this means, when
someone reading the other person’s blog post sees the link to your blog and
click on it to visit your site.
5.
Guest posting
Guest posting
is the process of creating quality content and publishing it on another
person's blog. This is a great way of building online reputation and promoting
your blog. To do this you need to contact
other blog owners and offer to write a post for their site. When the visitors to the
blog you are ‘guest posting’ to enjoy your posts, then expect them to also
visit your blog through the links you included in your posts. Some bloggers may
object this idea, please look for those who are interested and work with them.
6. Youtube
Make video clips that are related to your blog content and share those videos on youtube and then add links to your blog under the videos asking people to click them for more information on what you discussed in the video clip you posted. When they click the link it will take them to your blog.
Now we have completed all the steps
that you need to setup your blog and attract readers.
The next and final step will teach
you how to make money from your blog...:)
Step 7: HOW TO MAKE MONEY BLOGGING
There are lots of ways to monetize
your blog once you have a good number of visitors to your site. One of the most
lucrative ways also happens to be the easiest.
Having a large number of visitors to
your blog means that advertisers will pay to have their ads displayed on your site.
The easiest way to start getting paid from advertisements on your site is to
join Google’s AdSense program at http://www.google.com/adsense.
Once you setup your account on
AdSense you will be given a code to add to your blog. This code will
automatically display advertisements on your blog from companies who are part
of Google’s advertising network. One nice thing about AdSense is that
you have thousands of advertisers bidding to advertise on your blog, and all
you have to do is add the simple code to your website. Once you do that the
rest of the process is completely hands off.
Every time one of your visitors
clicks on an ad, you get paid. Google collects the money from the advertisers
and then cuts you a check (usually every month).
This arrangement is nice not only
because it is hands-off, but because you are dealing with a reputable company
that you know will actually pay you and on time.
How much can you make?
The amount that you can make from
AdSense depends on three factors:
1.
The topic you are blogging about
This is the first and most important decision that if you make a mistake about a lot of things may go wrong. What I mean is that, if you choose the wrong topic then
you begin walking down the wrong path and it might be months before you even
realize what you have done and change direction.
Here are some common mistakes people
make when choosing a topic to write a blog about:
- Don’t pick a subject just because you see others make money writing about it
- Avoid writing about something you only are passionate but a lot of people are not.
- Don’t base a blog on a topic you know little about or have minimal practical experience in.
- Be careful not to write about too diverse a range of subjects, your blog must have a focus.
A small amount of highly targeted customers can lead to a six figure or more income. While it’s great to have 10,000 blog visits a day it doesn’t necessary mean you will make money from a higher percentage of these visitors, moreover, these are difficult numbers to reach and most people never do.
The blog you are on now only talks about how to start your own blogs, which means I target only those who are thinking on how to start their own blog like you reading this now (lol) and my major means of income. So target customers who are interested in your niche.
3.
The number of visitors to your site
This one is pretty obvious. More
people visiting your blog means more clicks on advertisements, which means more
money for you.
4. The visibility of the ads
When you put the AdSense code on
your site you have a choice of the style of advertisements that go on your site
(large images, small images, text, etc.) and also where they are placed. The
more prominent the ads are displayed the more likely they are to be clicked.
However, you have to balance placing the ads prominently with the possibility of annoying your readers. We have all visited blogs where it’s
difficult to see the content due to the number and size of the ads. This is a
delicate balance to achieve and it’s something you will have to experiment with
to get the most out of your site.
CONCLUSION
This concludes the 7 simple and easy steps on how to start a blog. I hope it was of help to you? And you are already setting up your own blog. Remember to contact me, if you encounter any challenge or want me to setup a blog for you. P.S. I do not charge a dime for doing this.
Of course, there is still much more
to learn about blogging once you have followed this guide. I wish you success and and hope to see you become like one of these top 10 earning bloggers.
If you enjoyed this free guide on how to start your blog using BlueHost why not help spread the word by sharing with your friends through one of the links below. I would also love to read your comments use the add comments button below.
Thank you.
No comments:
Post a Comment