Go to step #2 Here: HOW TO SETUP YOUR BLOG
Go to step #3 Here: HOW TO USE YOUR NEW BLOG
At this stage you should have installed WordPress. If not, go to Step #2 here and install it.
I believe you should have familiarized yourself with the basics on
how to use your blog by now. WordPress is a flexible and easy to use tool that
allows you to build your blog to any layout, shape or design of your choice. In
this section we will get into more details such as how to personalize, change
layout and design of your blog.
How to change your ‘Basic Blog Design’
WordPress has a whole lot of free layouts that you can use
to change the appearance of your blog within minutes.
You change the layout of your blog by using “Themes” in
WordPress. To carry out this change, click on the “Appearance” tab on the left
menu, it is under “Marketplace”.

WordPress blogs come with pre-installed themes. Some of the popular themes are Twenty Twelve, Twenty Fourteen, Twenty Fifteen etc. all these themes can be used for almost any type of blog. Most professional bloggers around the world use these free themes.
Except you are building a special blog otherwise any of the
pre-installed themes should work for you. Let’s use the “Twenty Twelve” theme
as an example. To choose this theme for your blog, just move your mouse pointer
over it and click the “Activate” button. Voila! You have a new theme for your
blog. See image below:

You don’t like any of the pre-installed themes? Don’t bother yourself because there are uncountable themes that are available for free installation. To install a new layout or theme, click on the “Appearance” tab again then click on the “Add New” button as shown on the image below.

You will find a search box on the next screen. On this
screen you have many options on how to find a theme for your blog. You have the
choices of searching by color, layout and by using the “Feature Filter” button.
Click on Feature Filter, check the boxes you want and click “Apply Filters”
button. See the image below for more details.


When the theme is installed click “Activate” button to
activate the theme on your blog. To view the new layout of your blog, open
internet browser and type your sitename.com, press the ‘ENTER’ button and view
your blog’s new look!
The administration area is where you create menus. Click on
“Appearance” tab then click on “Menus”. See the image below:

Let’s create a new menu called “Main Menu”. Enter the name in the “Menu Name” box and click “Create Menu” button.


Let’s add another item to the navigation menu. To add a link to a page that was created earlier, click on “Pages” section of the menu editor. See the image below:


Here you can browse through the available themes, when you
find the one of your choice, move your mouse pointer over it and click the blue
“Install” button.

How to Create Menus
Now, let’s walk through the process of creating a basic
navigation menu so that visitors to your blog can easily navigate through
sections on your site.

Let’s create a new menu called “Main Menu”. Enter the name in the “Menu Name” box and click “Create Menu” button.

You can start adding items to the menu. For instance, to add
a link to the homepage of a blog.
Click on “Custom Links”. Then enter the URL of the blog’s
homepage. The home page is your domain name with “http://” in front of it (without quotes “”). i.e, http://yoursitename.com
Now enter the “Link Text” this is the text that will appear
in the menu in the link to your homepage. Call the link “Home”.
Once you finish entering the URL and link text, click “Add
to Menu”. See the image below:

Let’s add another item to the navigation menu. To add a link to a page that was created earlier, click on “Pages” section of the menu editor. See the image below:

Once you click on pages, it will bring up all the pages that
have been created so far. If no pages are created, then this area may show a
“Sample Page” or appear blank. To create a new page, click “Pages” on the
left-menu of your blog's administrator area and click “Add New”.
Let's add a page to the menu called “Contact Me”. To do this
click the check box next to the page and then click “Add to Menu”. Then click
“Save Menu” button to save the changes made. See the image below:

You have successfully created your menu; now add the menu to
your blog. In order to do this, click on the “Manage Locations” tab. In this
example, let's add the menu we created earlier called (“Main Menu”) to the
“Primary Menu” area. Use the drop-down box to do this and click the “Save
Changes” button.

How to Customize Your Blog's Design
Now you have your basic blog design and navigation completed. To
further customize your blog, go to the “Appearance” tab on the left-menu of
your blog administrator area and click on the “Customize” button.
Clicking the ‘customize button’ will take you to a screen
that displays your blog homepage on the right and the customization menu on the
left.
NOTE: If your theme is different from the one used in this
guide, then you may have slight difference in your customization.

On this screen you have different customizations. Let’s walk
through them one after another.
Site Title & Tagline
This is where you change the title and sub-title of your
blog. If you choose to totally remove them, simply uncheck the “Display Header
Text” box and it will not display anymore.
Colors
This is where you change the background and text colors of
your header.
Header Image
This option allows you to add an image to your header. Note
that each theme has a different recommended image size for headers.
Background Image
This is where you change the background of your blog to an
image instead of a solid color. You also upload images in this section.
Navigation
The navigation menus
you want to use can be chosen from here. Note that the menus you want to choose
must have been created already, as shown in an earlier step on this page.
Widgets
The various items that are added to your blog sidebar menus
are called Widgets. This section is where you add or remove widgets from your
sidebar menu(s). This is a little more difficult than the previous options, so
let’s see an example.
To do this, click on “Widgets” and then click “Main
Sidebar”. This will display a list of the widgets that are currently in use on
the “Main Sidebar”.

There are 3 widgets: Search, Archives, and Meta.


You have a whole lots of widgets to add just as you wish, you may explore them.
Adding Plugins
Third party developers have created additional tools that you can freely add to your blogs which are called “Plugins”. A lot of free plugins are available out there that can help you carry out different things on your blog.
How to Change Your User Details
You can see those 3 widgets in the right sidebar area on
your blog. The Search widget creates a search box, the Archives widget displays
a monthly archive of your posts, and the Meta widget shows different links
related to your blog.
I prefer to delete all these widgets. To do this, click the
arrow next to the widget name and then click “Remove” button to delete it.

After removing the widgets I will add new one of my choice.
To do this click the “Add a Widget” button and select the widget you want.
Let's add the “Recent Posts” widget which will create
links to the most recent blog posts in the sidebar area.

Let's also add “Calendar” widget which will display the
current month’s calendar with dates. Once it is added, click the “Save &
Publish” button.

You have a whole lots of widgets to add just as you wish, you may explore them.
Adding Plugins
Third party developers have created additional tools that you can freely add to your blogs which are called “Plugins”. A lot of free plugins are available out there that can help you carry out different things on your blog.
Plugins such as the ones for adding social media buttons,
creating contact forms or enhancing your site’s visibility to search engines etc.
One of such plugin I recommend for new bloggers is called
“JetPack”.
This plugin has a lot of easy to use features. You can use
it to add images to your sidebar menus, publish your posts on facebook, see how
many visitors your page receives daily and many other features.
Plugins are optional and Jetpack is not an exception. You
can start blogging smoothly without JetPack or other plugins. Nevertheless, you
will benefit from the additional features that come with it. If you want to
learn how to install it, I will add a link here soon on How to Install Jetpack.
When you start a new blog it is important to change your
user details so that people know who you’re.
On this details page you may want to change your Nickname and E-mail. Your nickname is the public name that appears on all the posts you make, this should be on your mind when selecting it.
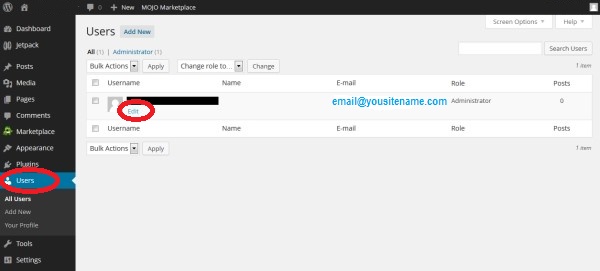
In order to do this, click on “Users” tab on the left menu.
Then click “Edit” under your username.

On this details page you may want to change your Nickname and E-mail. Your nickname is the public name that appears on all the posts you make, this should be on your mind when selecting it.
Now type the name you want into the “Nickname” box and then
choose that same name in the drop-down box next to “Display name publicly as”.
You can also change your email address if you want.

When you are done making all the necessary changes ensure you click the “Update Profile” button at the bottom of the screen in order to save the changes.

When you are done making all the necessary changes ensure you click the “Update Profile” button at the bottom of the screen in order to save the changes.
More Helpful Tips will be added here soon.
Now that you have completed this long step, you should have
an attractive and functioning blog. You are always free to make additional
changes to your blog at any time. You may not have a perfect blog from the
beginning but keep making corrections and changes where needed until your blog
becomes perfect.
Go to step #5 Here: HOW TO START BLOGGING
Go to step #6 Here: HOW TO PROMOTE YOUR BLOG
Go to step #7 Here: HOW TO MAKE MONEY BLOGGING
No comments:
Post a Comment